Set up Chainguard Checks and Chainguard Workspaces
How Chainguard Checks and Chainguard Workspaces work together, and how to sign up for both with chainctl develop init …
10 min read
For the complete documentation index, see llms.txt.
A CI/CD pipeline touches most of your software supply chain: the code you commit, the credentials your runners hold, the dependencies you pull, the image you build, and the artifact you ship. Chainguard has something to offer at each of those points.
This page walks the whole path in order so you can see how the pieces relate before you start wiring any of them up. It’s a map rather than a tutorial. Each stage gives you the one command that anchors it, then links to the guide that covers the details.
You don’t have to adopt every stage, and you don’t have to adopt them in order. Most organizations start at Pull trusted inputs, because swapping a base image is the smallest change with the largest effect, then work outward from there.
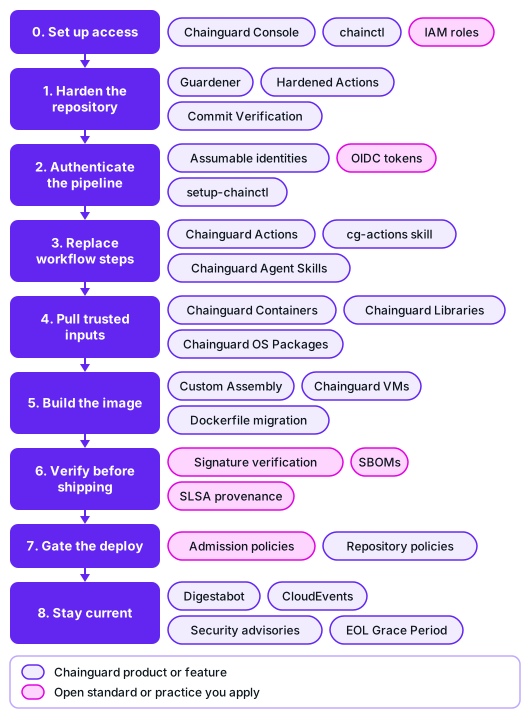
Before anything else, you need a Chainguard organization, chainctl installed and authenticated, and enough permission to create identities and entitlements. Several stages that follow need the owner role. Work through Get started with chainctl to install the tool, then log in:
chainctl auth loginThe Chainguard Console covers the same ground in a browser, and comparing chainctl to the Console shows which tasks belong to which. To plan who can do what, see roles and role bindings.
Why it matters. Access lives in one place instead of scattered across registry credentials on individual machines. When someone changes teams, you revoke a role binding rather than hunting for keys.
Recent supply chain attacks have targeted the workflow file, not the artifact it produces. Guardener hardens the repository itself through a suite of capabilities you turn on one at a time.
Two of them run through the Chainguard App, enabled per repository by a file you commit to .chainguard/:
A third runs locally rather than through the app:
chainctl agent dockerfile commands.To install the app and link your Chainguard organization to your GitHub organization, see getting started with Guardener.
Why it matters. An attacker who can edit a workflow already has your secrets. Hardening the repository closes that door before anything reaches your build.
Your pipeline needs credentials to pull from Chainguard, and a long-lived API key stored in repository secrets is the weakest way to supply them. Chainguard uses assumable identities instead: your CI job presents the OIDC token its platform already issues, and exchanges it for a short-lived Chainguard token.
On GitHub Actions, the setup-chainctl action handles the exchange:
permissions:
  id-token: write
  contents: read

steps:
  - uses: chainguard-dev/setup-chainctl@2cddd35a2f120d9973e58094dc6878c93cf58c28 # v0.5.1
    with:
      identity: "<identity-id>"
On GitLab, Jenkins, or a shell script, pass the platform’s token to chainctl directly:
chainctl auth login \
  --identity="$IDENTITY_ID" \
  --identity-token="$OIDC_TOKEN"
Automating with chainctl covers non-interactive use, and the identity examples include worked setups for GitHub, GitLab, and several cloud providers.
On Catalog Starter. Chainguard Catalog Starter organizations can’t create assumable identities, so neither approach in this stage works. Authenticate with a pull token instead, as described in Authenticate CI pipelines with a pull token.
Why it matters. There’s no long-lived credential to leak, rotate, or track. A token that shows up in a build log has already expired by the time anyone reads it.
Chainguard Actions are hardened drop-in replacements for popular GitHub Actions. Each one keeps the same inputs and outputs as the upstream version, so migrating a step means changing the uses: line and nothing else.
Enable the entitlement for your organization:
chainctl actions entitlements createThen point each step at its hardened equivalent, pinned to a commit digest:
- uses: chainguard-actions/tj-actions-changed-files@<commit-sha> # v47Repository names in chainguard-actions carry the upstream organization as a prefix, so tj-actions/changed-files becomes tj-actions-changed-files. Run chainctl actions discover to list every action and container image your workflows reference, which tells you what there is to migrate. If your GitHub organization restricts which actions can run, add chainguard-actions/* to the allowed patterns first.
You don’t have to make these edits by hand. Two tools do the migration for you, and which one fits depends on how much you’re moving at once:
chainctl guardener github migrate create. Use this for a centralized, organization-wide rollout.To move pull request checks off GitHub Actions runners instead, Chainguard Checks runs each check in its own microVM. Refer to Migrate from GitHub Actions to Chainguard Checks.
Separately, if agents run anywhere in your pipeline, Chainguard Agent Skills applies the same hardening idea to the skills those agents load.
Why it matters. Migration is a one-line change per step, and it removes whole classes of attack — tag hijacking, pull_request_target abuse, and secret exfiltration — without changing what your workflow does.
This is where most teams start. Point your builds at Chainguard for the three kinds of input a pipeline pulls:
Container images. Authenticate to cgr.dev and pull from your organization’s namespace. See authenticating to the registry.
chainctl auth configure-dockerLanguage dependencies. Chainguard Libraries rebuilds Java, Python, and JavaScript packages from source, and they’re drop-in replacements for what you’d pull from Maven Central, PyPI, or npm. Configure your package manager with chainctl auth configure-npm or the equivalent for your ecosystem, then follow the quickstart.
System packages. Chainguard OS Packages are the APK packages the container images are assembled from, available when you need to install something at build time.
All of these are served through the Chainguard Repository, which is also where you set the policies that govern what your organization is allowed to pull.
Why it matters. Remediation happens upstream of your build. When a CVE is fixed, your next build inherits the fix instead of your team opening a ticket to chase it.
Build your application on a Chainguard base image, using the -dev variant for the build stage and the minimal runtime variant for the final stage. Migrating to Chainguard Containers covers the patterns, and the Dockerfile conversion tool does the mechanical part.
When your runtime image needs packages the standard image doesn’t carry, Custom Assembly builds a variant to your specification. You can trigger those builds from CI:
chainctl images repos build apply --file custom-jre.yaml \
  --parent <organization> \
  --repo <image-name> \
  --yes
Triggering builds in CI/CD workflows shows the full GitOps pattern. If you ship virtual-machine images rather than containers, Chainguard VMs applies the same approach to VM base images.
Why it matters. You maintain your application layer and Chainguard maintains everything underneath it. That’s the difference between patching a distribution’s backlog and shipping your own code.
Every Chainguard container image and library ships with a signed SBOM and provenance attestation. Verifying them in CI turns those signatures into a gate rather than a document nobody reads.
Check an image signature with cosign:
cosign verify \
  --certificate-oidc-issuer=https://issuer.enforce.dev \
  --certificate-identity-regexp="https://issuer.enforce.dev/<organization-id>/.*" \
  cgr.dev/<organization>/<image-name>:latest
See verifying signatures with cosign for what the command proves, and retrieving image SBOMs for pulling the SBOM itself. For dependencies, chainctl libraries verify reports which of your artifacts Chainguard built; verifying Chainguard Libraries covers the detail.
Why it matters. The evidence an auditor asks for is generated by the pipeline that shipped the artifact, not reconstructed from memory months later.
Verification in CI only covers what went through CI. An admission controller enforces the same rules at the cluster boundary, so an image that skipped your pipeline can’t run. Chainguard documents policies for both Kyverno and OPA Gatekeeper.
Further upstream, container policies and library policies in the Chainguard Repository govern what your organization can pull in the first place.
Why it matters. The guarantee holds at runtime, not only at build time. Policy catches the deployment that bypassed the pipeline, which is the one you’d otherwise never hear about.
Chainguard rebuilds images continuously, so the value of a low-CVE image depends on how quickly you pick up the new digest. Automate that:
Track what’s changing with security advisories and the changelog. When an image version approaches end of life, the End-of-Life Grace Period gives you a defined window to migrate; see considerations for image updates.
Why it matters. Pinning a digest and walking away turns a current image into a stale one. Automating the bump is what keeps “low CVE” true next quarter instead of only on the day you adopted it.
Last updated: 2026-10-14 15:19